Skip to content

Jabra .NET SDK

With the Jabra .NET SDK, you can easily integrate Jabra device functionality into your .NET applications for Windows.

The SDK supports the following use cases:

  • Call control integration for softphones
  • Getting detailed device information
  • Changing camera, headset and speakerphone settings
  • Getting audio, video and wireless telemetry data

Supported runtimes

.NET Framework 4.7.1 or later
.NET Core
.NET 5 or later

Supported Operating Systems

Windows 10 and Windows 11 (x64, arm64)

macOS and Linux not supported

The SDK also works for .NET applications on macOS and in common Linux distributions. This is however not officially supported by Jabra and we do not recommend using the .NET SDK for production applications for macOS or Linux at this point in time.
Please contact us if you consider using the Jabra .NET SDK for an application for macOS or Linux.

Installing SDK modules

Jabra .NET SDK is available through nuget.org. The SDK consists of multiple modules.

Core module

  • Jabra.NET.Sdk is the core SDK module and mandatory dependencies: Jabra.NET.Sdk
dotnet add package Jabra.NET.Sdk

The core module is mandatory for all SDK integrations and contains everything you need for:

  • Device detection
  • Call control integration into softphones
  • Basic device information such as name of device, serial number, product ID

Properties module

dotnet add package Jabra.NET.Sdk.Properties

The Properties module provides access to the following functionalities:

  • Reading and modifying device settings
  • Getting telemetry information
  • Accessing advanced device information such as firmware version

.NET Framework - Copy files to output folder

If your application is using .NET Framework, you need to configure your project to copy all the files from the Jabra.Utilities/DeviceConnector/win32 to the output directory when you build your project. Mark all the files in the folder in Visual Studio and select either Copy always or Copy if newer in the Properties window. Copy files to Output Directory 
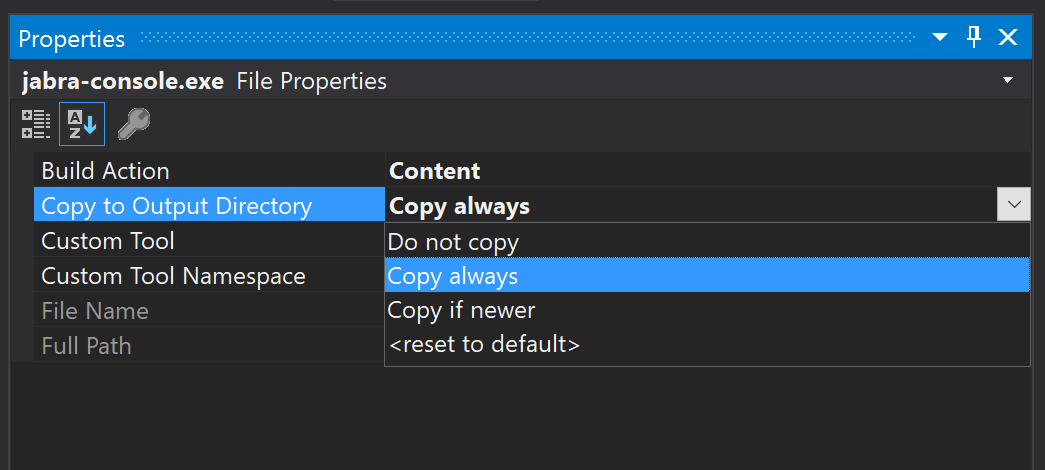
Note: If your application is using .NET Core or .NET 5 (or later) you don't need to manually configure copying to Output Directory.

Getting Started

The simplest way to get started is to try out our code samples.

Initializing the SDK

To use any of the functionality of the SDK, you first need to initialize it. The recommended way to do this is via the Jabra.NET.Sdk.Core.Init.InitManualSdkstatic function. Using this, you can set up subscriptions to error handling and device discovery before finalizing initialization:

C#
using Jabra.NET.Sdk.Core;

internal class Program
{
    public static async Task Main()
    {
        var config = new Config(
            partnerKey: "[Your Partner Key]", // We recommend initializing with a proper Partner Key. 
            appId: "my-app-id", // may contain a combination of letters (A-Z, a-z), numbers (123), underscores (_), and hyphens (-)
            appName: "My app name" // end-user friendly name for your application
        );
        // Begin init - not complete until jabraSdk.Start();
        IManualApi jabraSdk = Init.InitManualSdk(config); 
        // (...) setup error handling and device added/removed events (see below)
        await jabraSdk.Start();
    }
}

Get your Partner Key by contacting us through the support form.

Error handling

To receive logging messages from the SDK in your application, the IApi interface exposes an observable LogEvents which you can subscribe to, as illustrated in the following:

C#
// Subscribe to SDK log events.
jabraSdk.LogEvents.Subscribe((log) =>
{
    // Ignore info, warning, and debug log messages.
    if (log.Level == LogLevel.Error) Console.WriteLine(log.ToString());
});

Device added/removed

You can choose to subscribe to DeviceAdded/DeviceRemoved events or to subscribe to changes to the entire Jabra DeviceList.

C#
// Subscribe to Jabra devices being attached/detected by the SDK
jabraSdk.DeviceAdded.Subscribe(static async (IDevice device) =>
{
    Console.WriteLine($"Device attached/detected: {device.Name} (Product ID: {device.ProductId}, Serial #: {device.SerialNumber})");
    // (...) Your code working with the device here. Example: Set up Easy Call Control for the device, if you're building a softphone integration. 
});

// Subscribe to Jabra devices being detached
jabraSdk.DeviceRemoved.Subscribe((IDevice device) =>
{
    OutPutToConsole($"Device detached: {device.Name} (Product ID: {device.ProductId}, Serial #: {device.SerialNumber})");
    // (...) Your code handling that the device was removed. Example: If you were using the device for call control, you might want to setup another device for call control. 
});

// Subscribe to changes in the entire list of Jabra devices
jabraSdk.DeviceList.Subscribe((List<IDevice> devices) =>
{
    Console.WriteLine("List of attached devices:");
    foreach (IDevice device in devices)
    {
        Console.WriteLine($"{device.Name} (Product ID: {device.ProductId}, Serial #: {device.SerialNumber})");
        // (...) Your code depending on whether this was the device you were looking for. Example: If device matches the audio device selected in a softphone, set up Easy Call Control for device. 
    }
});

Device connections

When an end-user connects a headset to their computer, some cases can lead to multiple connections.

Example: For a BT headset you can simultaneously connect the headset using a wireless dongle connection for calls, in addition to a wired USB cable connection. A new wired connection does not report the headset as an additional device, but merely as an additional connection for the same device.

For a device, you can subscribe to ConnectionAdded/ConnectionRemoved events or subscribe to changes to the entire ConnectionList. You can also get a list of CurrentConnections.

C#
// Connection added event
device.ConnectionAdded.Subscribe(async (IConnection connection) =>
{
    Console.WriteLine($"Connection type {connection.Type} added for: {device.Name}");
});

// Connection removed event
device.ConnectionRemoved.Subscribe(async (IConnection connection) => 
{
    Console.WriteLine($"Connection type {connection.Type} removed for: {device.Name}");
});

// Connection list changed event
device.ConnectionList.Subscribe(async (IEnumerable<IConnection> connections) =>
{
    Console.WriteLine($"Connections for device: {device.Name}");
    foreach (var connection in connections)
    {
        Console.WriteLine($"Connection type: {connection.Type}");
    }
});

Easy Call Control

The recommended way for integrating call control with Jabra headsets into a softphone is to use our Easy Call Control module (multi-call option) which is part of the core SDK module.

Legacy CallControl and Easy Call Control (single-call option)

If you have an existing softphone integration using the legacy CallControl or Easy Call Control (single-call option), you can keep using that and it is fully supported. However, for all new integrations, we strongly recommend basing only on Easy Call Control (multi-call option).

Easy Call Control offers a high-level abstraction for call control integrations and is intended to be quick and easy to integrate with no need to understand the complexities of signals to and from headsets.

Once Easy Call Control is setup for a device, you can change the call state using high-level methods. Likewise, you can subscribe to events from Easy Call Control letting you know what state the device has requested.

Call control sample code

See code samples for a complete demo implementation of Easy Call Control.

Set up Easy Call Control

To set up Easy Call Control for a device, you should first check that the device supports call control and then create an instance of Easy Call Control.

C#
// Create an Easy Call Control Factory from your 
// instance of the IApi you got when initializing SDK. 
EasyCallControlFactory easyCallControlFactory = new EasyCallControlFactory(jabraSdk); 
// If the device supports Easy Call Control, enable it.
if (easyCallControlFactory.SupportsEasyCallControl(device))
{
    IMultiCallControl easyCallControl = await easyCallControlFactory.CreateMultiCallControl(device);
}

Subscribe to events

By listening to these events your application can keep track of the call state of the device and update your application's state accordingly.

C#
// OngoingCalls is the number of ongoing calls on the device. This includes active and held calls. 
easyCallControl.OngoingCalls.Subscribe((ongoingCalls) =>
{
    // (...)
});

// MuteState is the microphone mute state of the device. 
easyCallControl.MuteState.Subscribe((isMuted) =>
{
    // (...)
});

// HoldState indicates if call is on hold or not. 
easyCallControl.HoldState.Subscribe((isOnHold) =>
{
    // (...)
});

// RingState indicates if the device is ringing or not (incoming call).
easyCallControl.RingState.Subscribe((isRinging) =>
{
    // (...)
});

// SwapRequest is called when the user wants to swap between two calls. 
easyCallControl.SwapRequest.Subscribe((_) =>
{
    // (...) 
});

Change call state

By using these methods you can update Easy Call Control with state changes from your application.

C#
// New incoming call
// Note there is an optional parameter for timeout in milliseconds. 
// After timeout the SDK considers the call Rejected. 
// The async call to SignalIncomingCall() will not resolve 
// until the call is either accepted or rejected.
Console.WriteLine("SignalIncomingCall()");
bool callAcceptedResult = await easyCallControl.SignalIncomingCall();
if (callAcceptedResult)
{
    Console.WriteLine("SignalIncomingCall() - Call accepted");
}
else
{
    Console.WriteLine("SignalIncomingCall() - Call rejected");
}
C#
// Accept incoming call. 
// Note there is an optional parameter in case of multiple calls to specify whether to 
// accept and hang up current call, or accept and put current call on hold.
await easyCallControl.AcceptIncomingCall();
C#
// Reject incoming call. 
await easyCallControl.RejectIncomingCall();
C#
// New outgoing call
await easyCallControl.StartCall();
C#
// End active call
await easyCallControl.EndCall();
C#
// Put active call on hold
await easyCallControl.Hold();
C#
// Resume call from held state
await easyCallControl.Resume();
C#
// Mute headset microphone
await easyCallControl.Mute();
C#
/// Unmute headset microphone
await easyCallControl.Unmute();

Properties

The properties module is used to get and set settings on Jabra devices and to listen for telemetry events from devices.
In the code samples below, you will find a link to a demo implementation of Device Settings and telemetry, while the main concepts are highlighted in the following. The demo implementation includes details on common properties for select meeting room, camera, and headset devices

Separate NuGet package

Before you can use the Properties module in your application, do remember to install the Properties module.

Setup Properties

To start interacting with Properties, first create an instance of the PropertyModule and then create an instance of the PropertyFactory.

C#
//Initialize the SDK's properties module
IPropertyModule jabraSdkProps = new PropertyModule(jabraSdk);
IPropertyFactory jabraSdkPropsFactory = await jabraSdkProps.CreatePropertyFactory();

PropertyMap

Before reading or writing properties to/from a device you need to define a PropertyMap of the properties you intend to use. In this example we're using two properties from the Jabra Panacast 50 meeting room camera.

C#
string[] propertyNames = {
    "zoomMode2",
    "(...) other properties you want to interact with"
};
IPropertyMap propertyMap = await jabraSdkPropsFactory.CreateProperties(device, propertyNames);

Read/write property

To read the current state of a setting (property) or change a setting, you simply Get the property or start a transaction for setting properties.

C#
// Reading value of the zoomMode2 property
PropertyValue zoomMode2 = await propertyMap["zoomMode2"].Get();
Console.WriteLine($"Zoom mode: {zoomMode2}");
C#
//Write properties to device.
IPropertyTransaction transaction = propertyMap.StartTransaction();
// Valid values for "zoomMode2": "fullScreen" | "intelligentZoom" | "activeSpeaker"
transaction.Set("zoomMode2", new StringPropertyValue("activeSpeaker")); 
// Additional transaction.Set lines for further settings 
// you want to change as part of same transaction. 
await transaction.Commit();

Some settings trigger reboot

Note that some of the settings you can change using properties will trigger Jabra devices to reboot. See Properties code sample for more.

Telemetry data

Some properties can be read and observed for ongoing telemetry data. Examples include the "peopleCount" property available in Jabra Panacast 50 meeting room camera or the "backgroundNoiseLevel" property available in Jabra Engage 40/50/50II headsets.

C#
// Observing a property 
IObservable<PropertyValue> propertyWatcher = propertyMap["peopleCount"].Watch;
propertyWatcher.Subscribe(value =>
{
  Console.WriteLine($"Property change observed on '{propertyMap.Device.Name}':");
  Console.WriteLine($"Received value (peopleCount): {value}");
});

Other properties

In the Properties code sample we're detailing common properties of interest for developers for select meeting room, camera, and headset devices. If you're interested in other settings or telemetry data points for Jabra devices, please contact us, detailing what you're looking for.

API reference

Please see the relevant API reference for detailed information on the SDK not covered in the above:

Code samples

Code samples are hosted on GitHub. Questions or requests for support for code samples should however be raised at this site through the support form.

Easy Call Control sample

The Easy Call Control sample demonstrates how to implement call control for Jabra devices in e.g. softphones using the recommended Jabra Easy Call Control SDK module.

Properties sample

The Properties code sample demonstrates how to read and write common settings for the Jabra Panacast 50 meeting room camera and the Jabra Engage 50 II headset. The sample also demonstrates how to observe telemetry data properties.